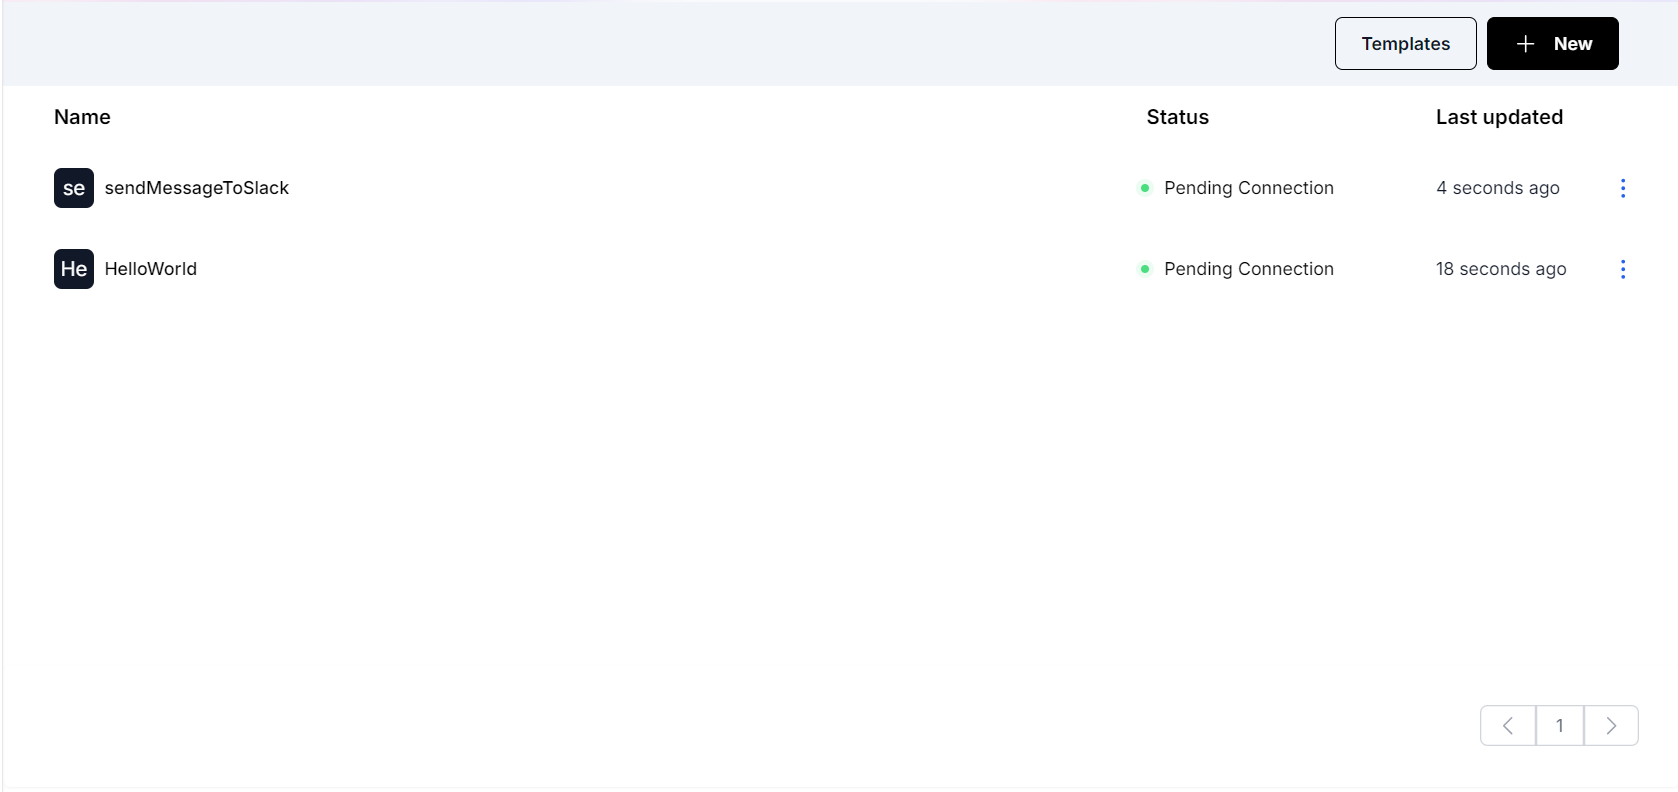
Export Shopify Products to Elasticsearch
Learn how to export data from Shopify to a database.
Introduction
In this guide we are going to create flows that will allow users to export product data from Shopify to Elasticsearch and configure event-based webhooks so that each new product is added to Elasticsearch automatically.
Prerequisites
-
An Elasticsearch cloud account is required. An Elasticsearch cloud endpoint and API key will be required to connect.
-
A Shopify account is required with a store setup and some products added as we are going to retrieve products for export.
Part I - Creating an Elasticsearch Index
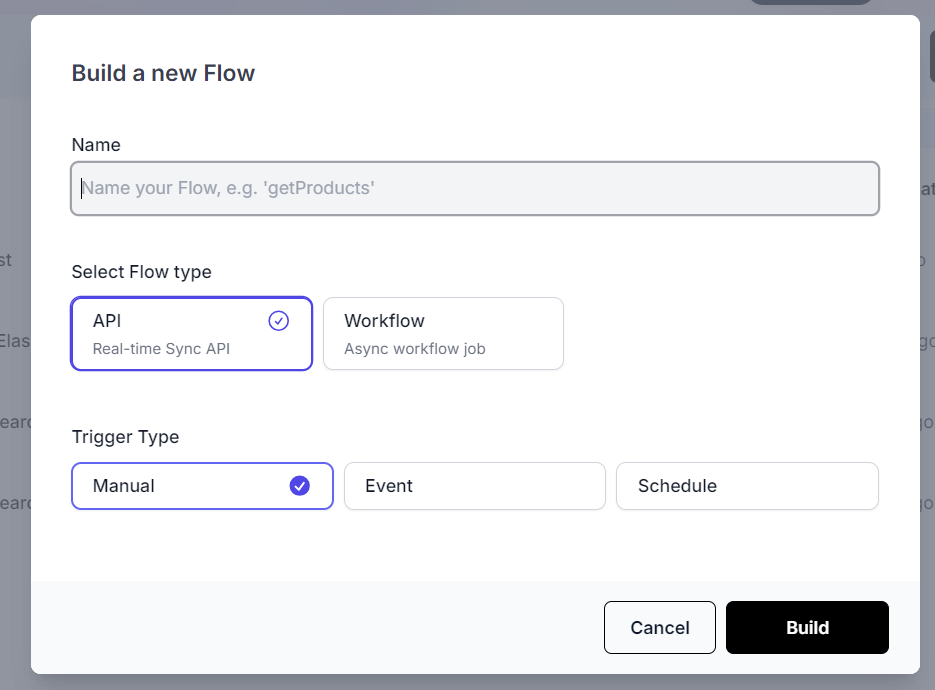
Create a new flow
- To start off, go to the
Flowspage from the navigation menu on the left. And add a new flow.
- Give your flow a name and create it as an API.
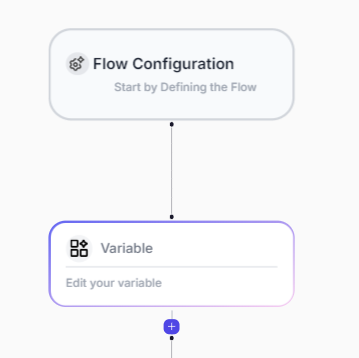
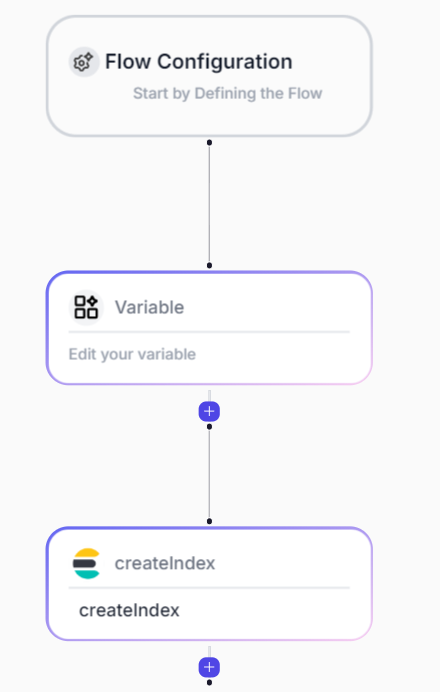
Add a Variables element
- As a first step in our new flow, we will add a
Variableselement. This will allow us to set and use variables throughout the flow.

- Drag and drop a
Variableselement from the right side menu into the flow.
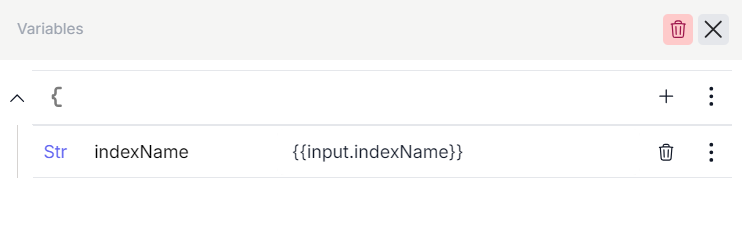
- We will add a new variable here. Let's name it
indexNameand give it the value{{input.indexName}}
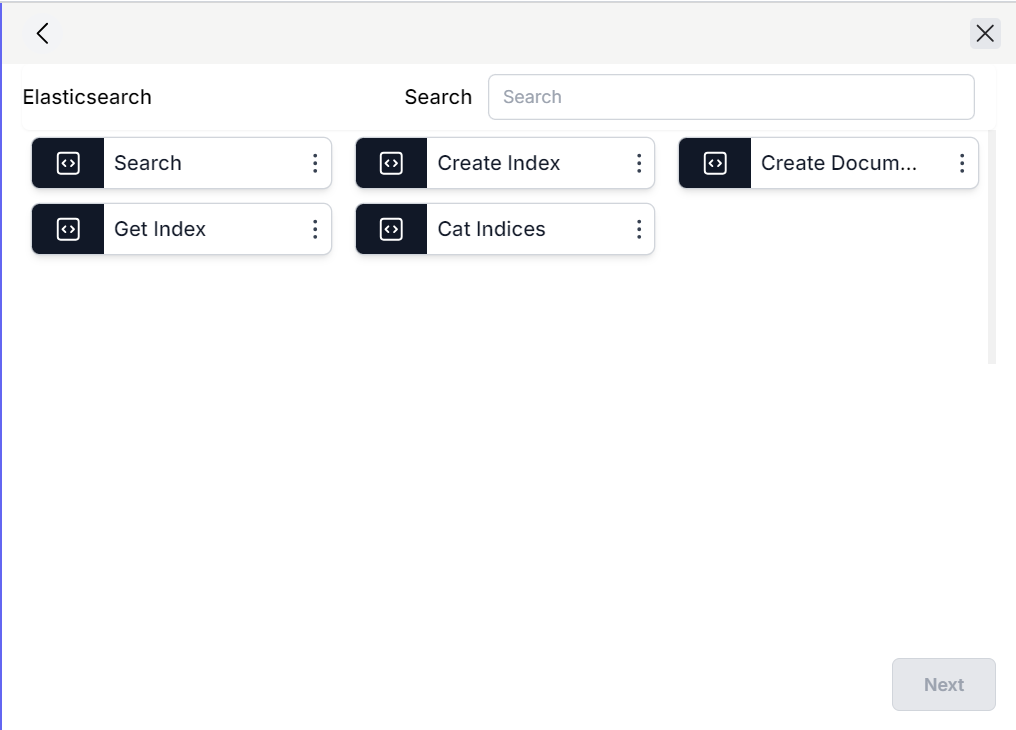
Add an Elasticsearch connector
-
Drag and drop a connector from the right side menu into the flow.
-
Select fastn connectors and search for the Elasticsearch connector.
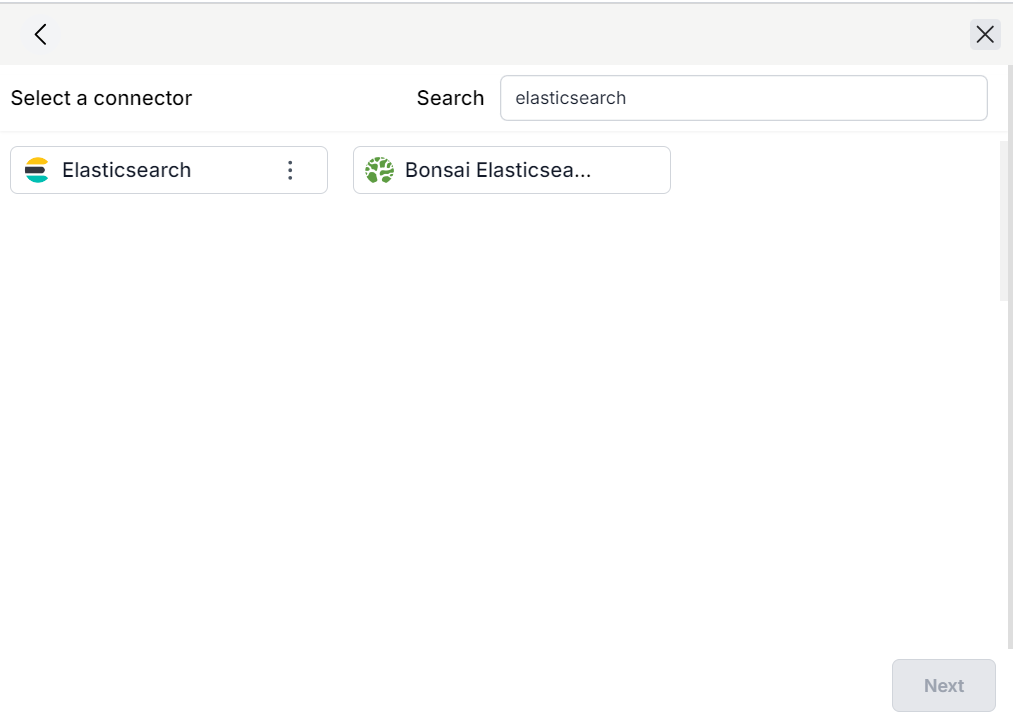
- The API we need here is the
Create IndexAPI.
- For now, save the connector so that your flow looks like the image below. We will fill the parameters in the next step.
Activate the Elasticsearch connector
-
The Elasticsearch connectors require certain parameters to authenticate and connect to the Elasticsearch cloud account. The advantage in fastn is that we only need to activate a a group of connectors once and they will auto-authenticated across multiple flows in a workspace.
-
To activate the connector go to the
Connectorspage from the navigation menu on the left. -
Go to fastn connectors and find the Elasticsearch connector.

- Click on the
Activatebutton and fill in the parameters for the cloud endpoint and the API key.
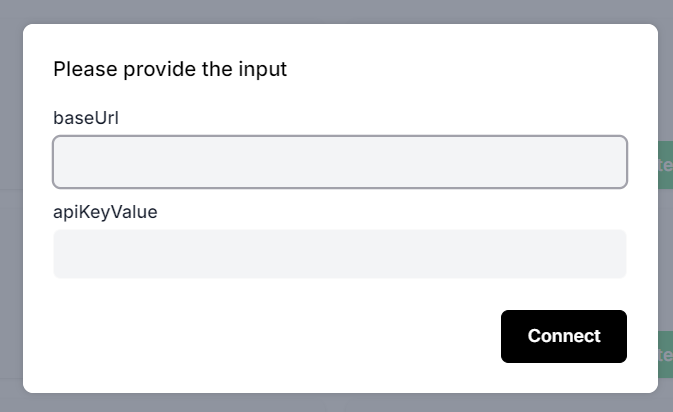
- Click on
Connectto activate the connector. After activation the connector status will update.

Testing the flow
-
Now return to the flow and click on the
Create Indexconnector element. -
Click on the
Disconnectedlabel next to the icon and select theDefaultoption. -
Click on
Connectand the connector status will be updated toConnected. -
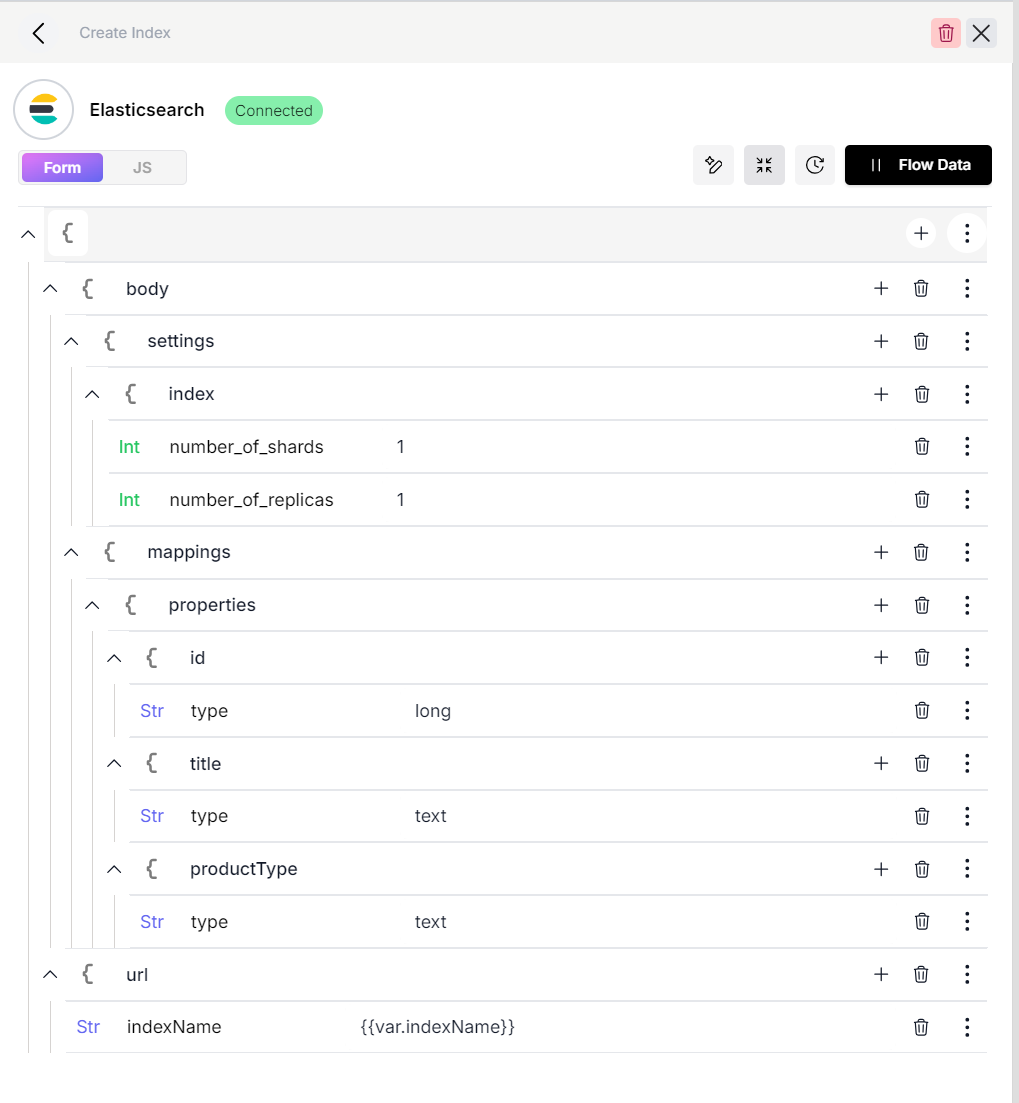
Fill in the params as shown below. For the purposes of this example we will only store limited product properties which will setup as mapping for this index.
- Use the Debugger to test this flow, add the input index as "products" as shown in the image below.
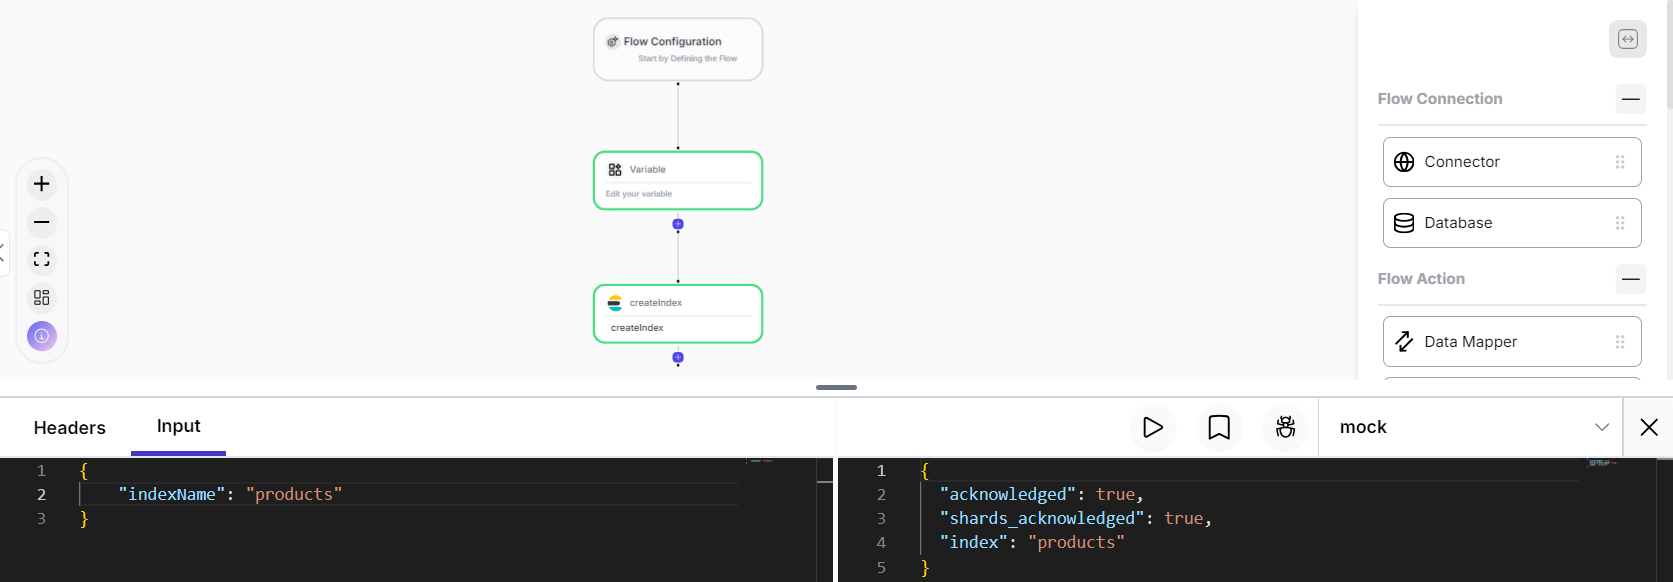
- Running this flow will create an index in Elasticsearch.
Part II - Get Shopify Products and Export to Elasticsearch
Activate the Shopify connector
-
Like we did for the Elasticsearch connector, we need to activate the Shopify connector so that it can be authenticated and linked to the store from where we want to fetch our products.
-
To activate the connector go to the
Connectorspage from the navigation menu on the left. -
Go to fastn connectors and find the Shopify connector.

- Click on the
Activatebutton and fill in the parameters for the store name.
- To get the store name, go to your Shopify store and copy the store name from the URL like shown below.

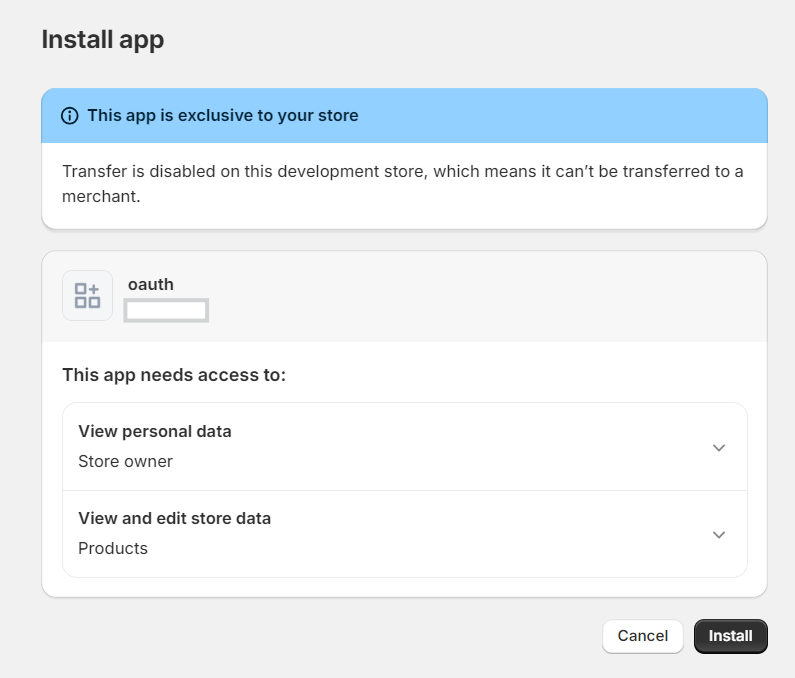
- The authentication will then redirect and ask for permissions. Click on
Install.
- After activation the connector status will update.
Create a flow
-
Like we did in Part I, we will create a new flow and name it.
-
We will add a
Variablestep and add anindexNamevariable with the value of{{input.indexName}}.
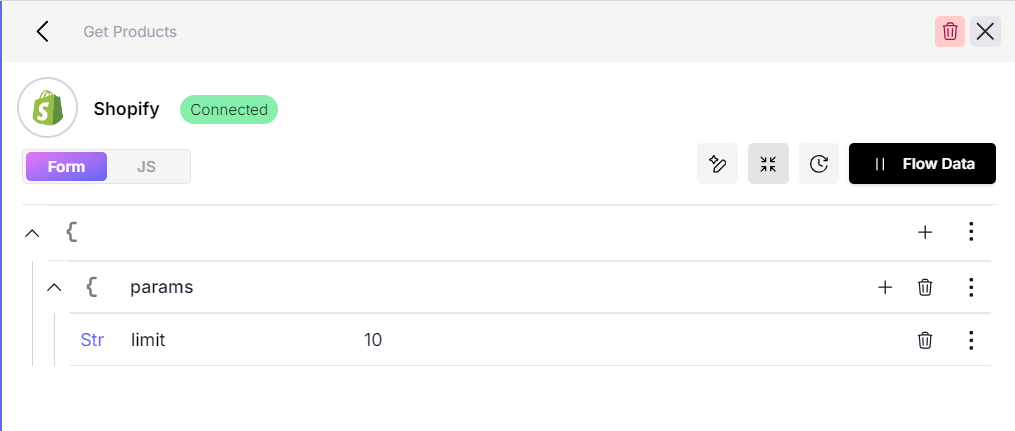
Get products from Shopify
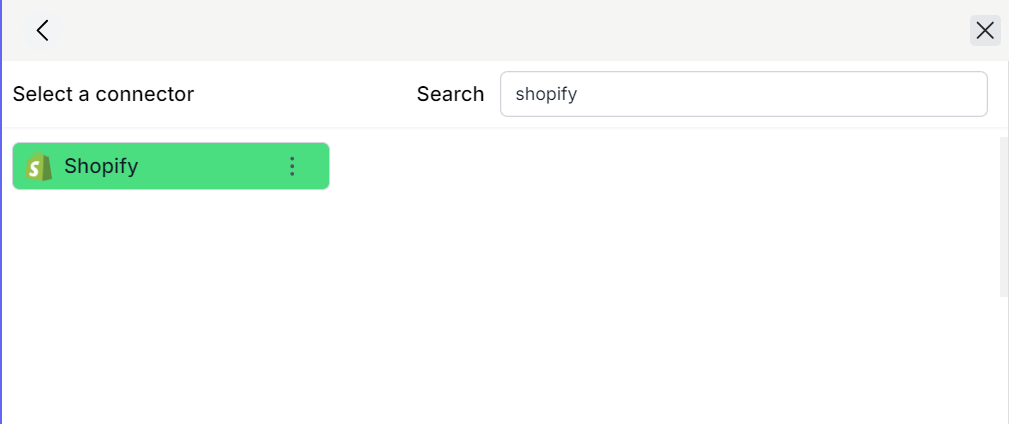
- Drag and drop a connector element. Choose fastn connectors and find Shopify.
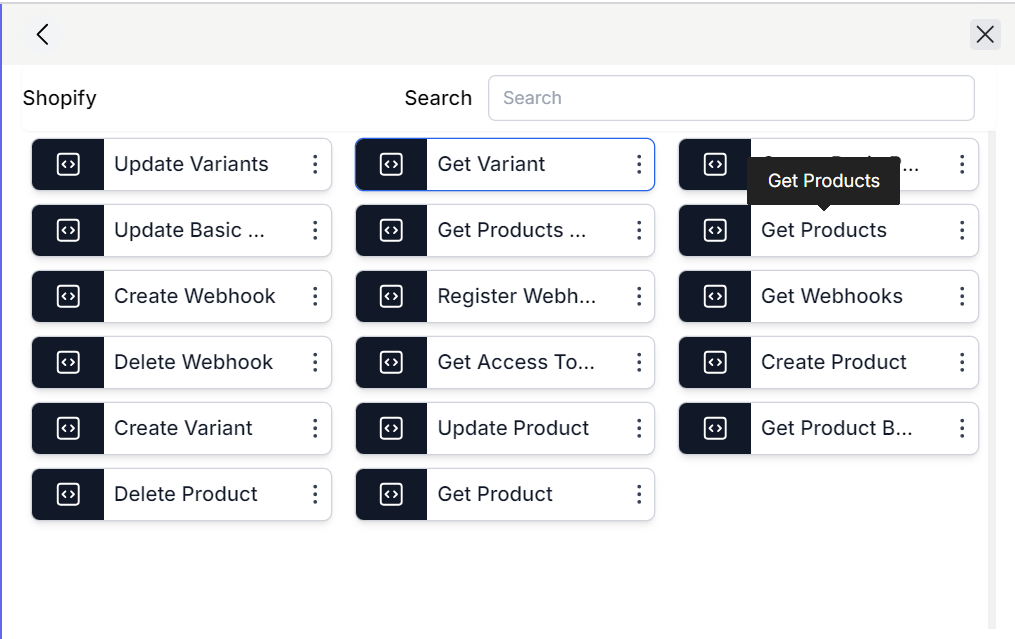
- Choose the
Get ProductsAPI.
-
Once the connector configuration opens up. Click on the
Disconnectedlabel next to the icon and select theDefaultoption. -
Click on
Connectand the connector status will be updated toConnected. -
Setup the connector parameters as in the image below. In this example we set the limit to 10 but it can be set to suitable alternate values or can be set through the flow input.
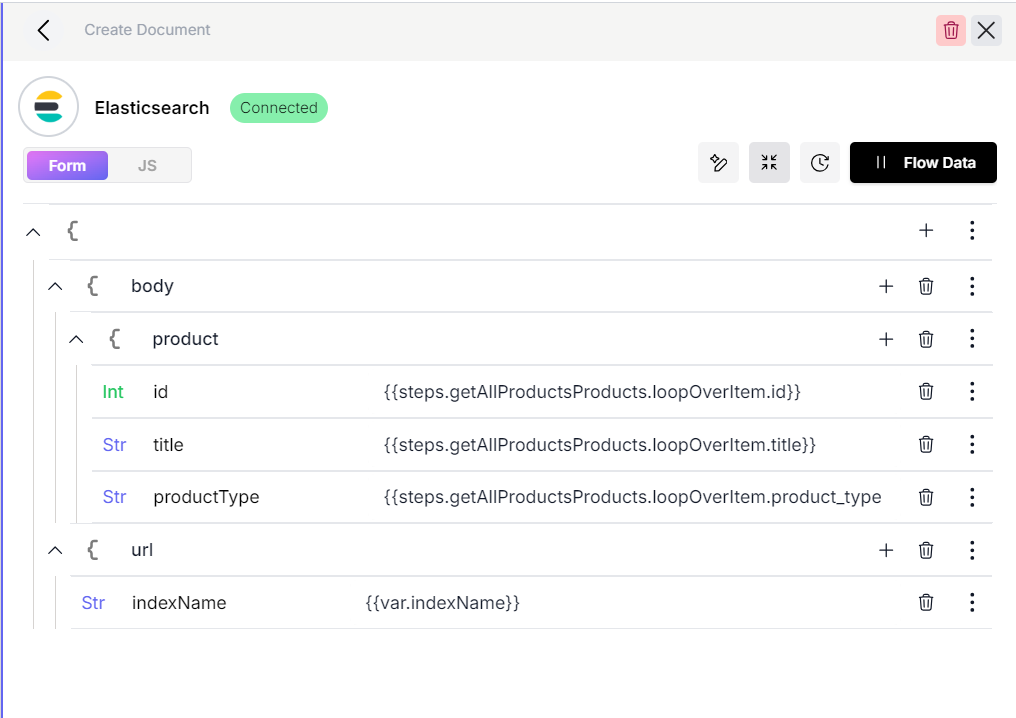
Create documents in Elasticsearch
-
Next, we need to add the Shopify products to Elasticsearch as documents
-
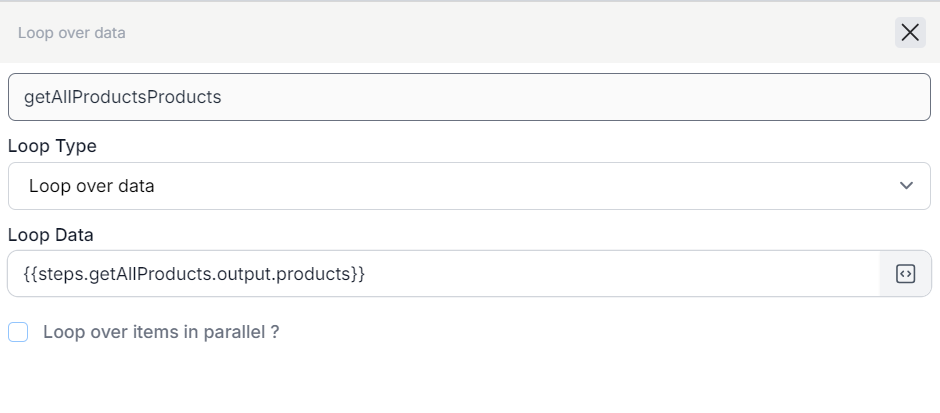
Drag and drop a Loop element and set it up to loop over the output of the get products Shopify API
-
Inside the loop, drag and drop a connector element and similar to how we setup the "Create Index" API, we are now to setup the "Create Document" API
-
Set it up as shown in the image below
Test the flow
- Use the Debugger to test this flow, add the input index as "products" as shown in the image below

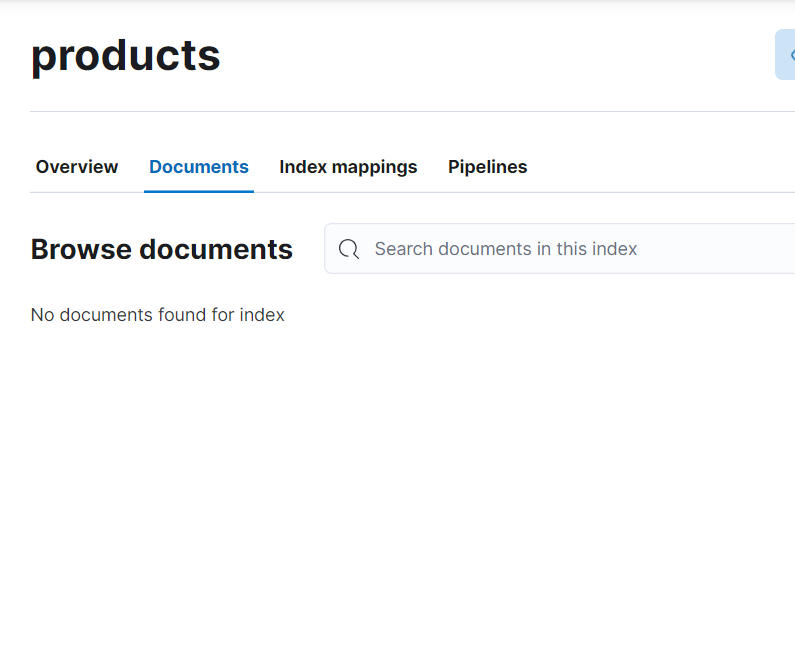
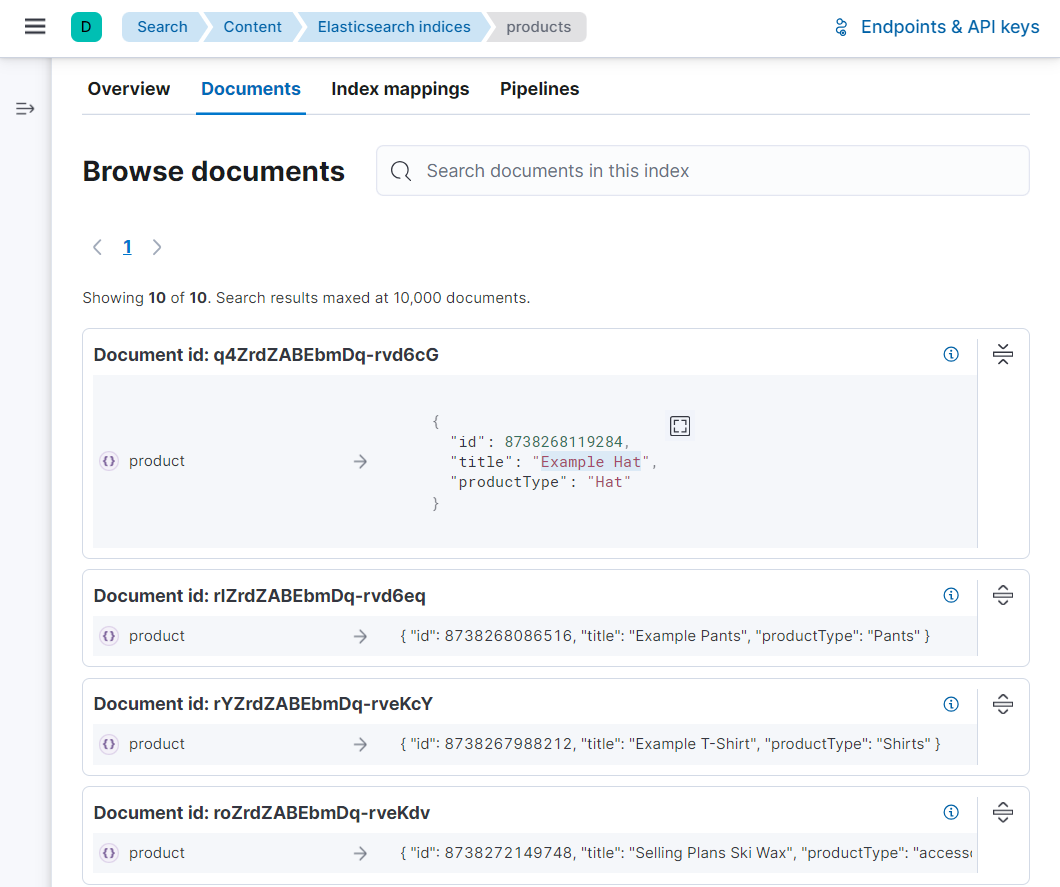
- In the Elasticsearch cloud, product documents will now be visible under the products index
Part III - Search by title
Create the search flow
-
The final flow we will create is the search flow, create a new flow and name it
-
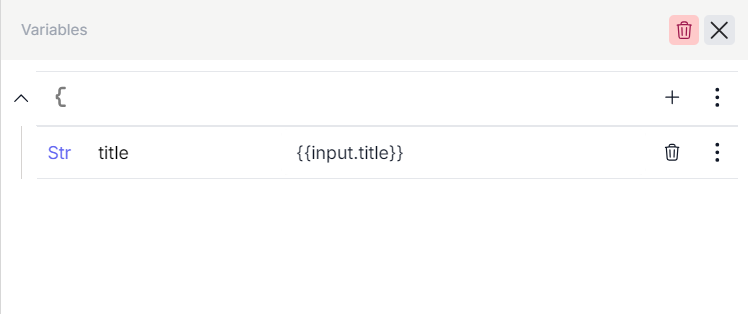
We will add a Variable step and add a "title" variable with the value of
{{input.title}}as shown below. This variable will be used to store the title value passed as input to be used for the search
Search API
-
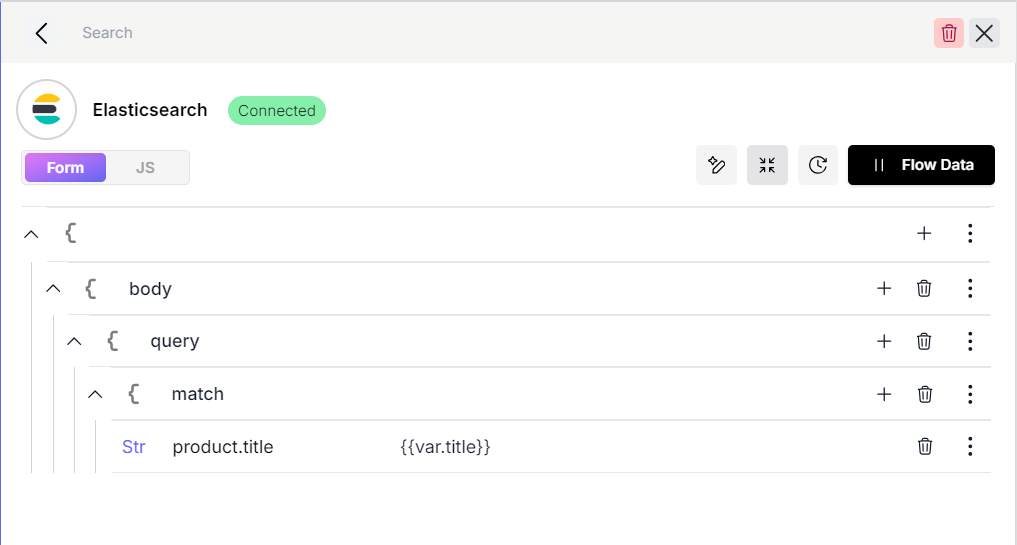
Drag and drop a connector element. Set it up as an Elasticsearch Search API similar to how we added Elasticsearch connectors in the previous two parts.
-
This connector has multiple optional parameters, but for now we are going to use a match query to search for the required product. Set the connector up as shown in the image below and remove any extra parameters.
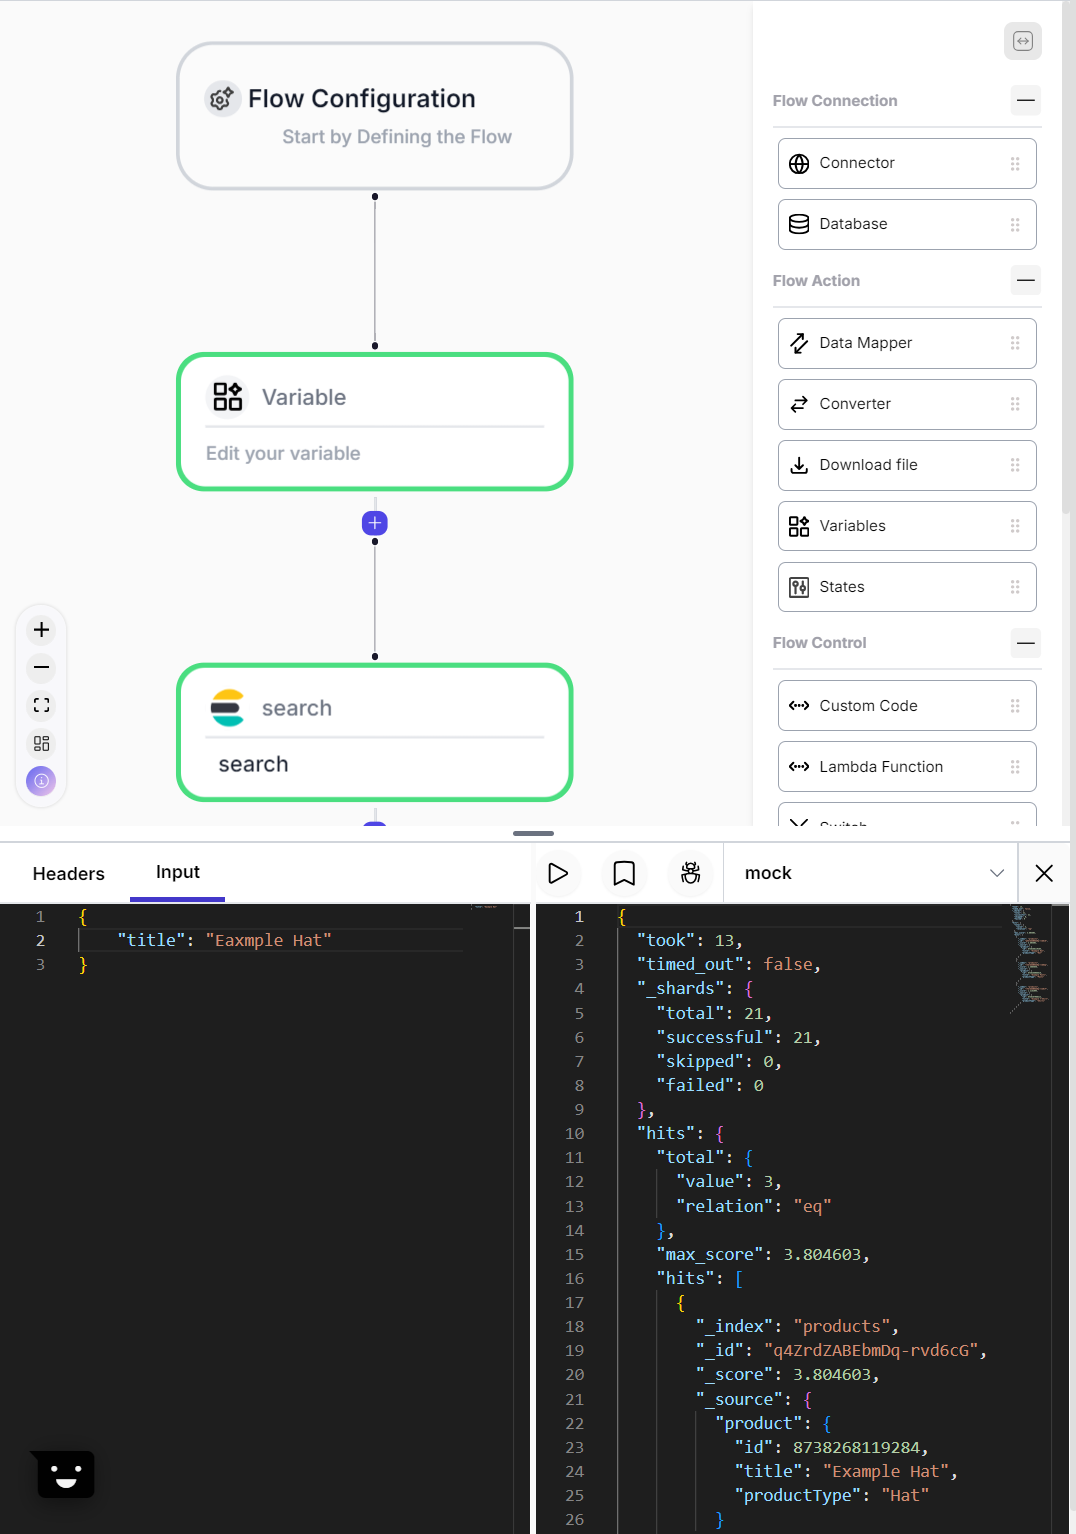
- To test this flow open the debugger and add the input title of "Example Hat" as shown in the image below and click on the
Run Testbutton. The response will contain the results of the search operation.
Part IV - Publish Product Updates to Elasticsearch
Creating a update flow
-
Now that the products have been added to Elasticsearch. We need to ensure that all new products in the store will be added automatically to the Elasticsearch database.
-
For that purpose we are going to create a new flow and give it a name.
-
This flow is going to be activated with a webhook. Whenever a new product is added, Shopify is going to call our webhook with certain information related to it.
-
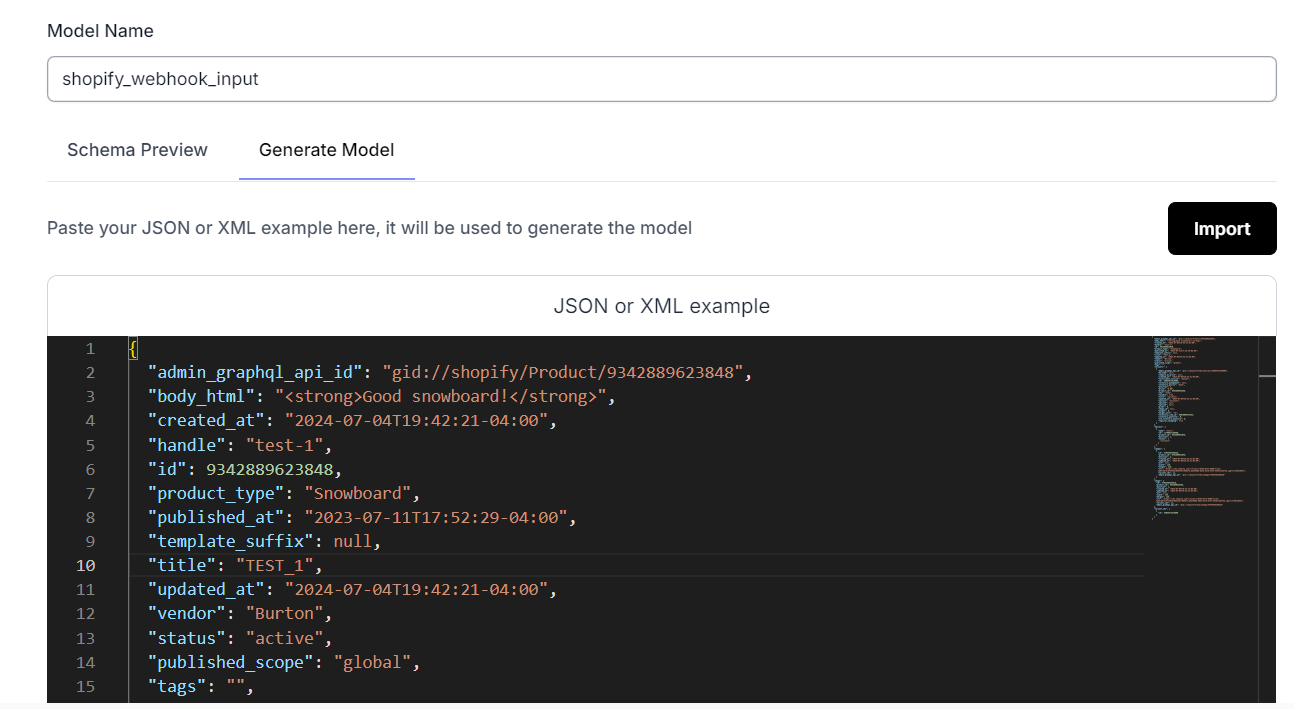
In the Flow Configuration step, we are going to define an input schema corresponding to the product data that the webhook will be called with. Click on the step and add a new model.
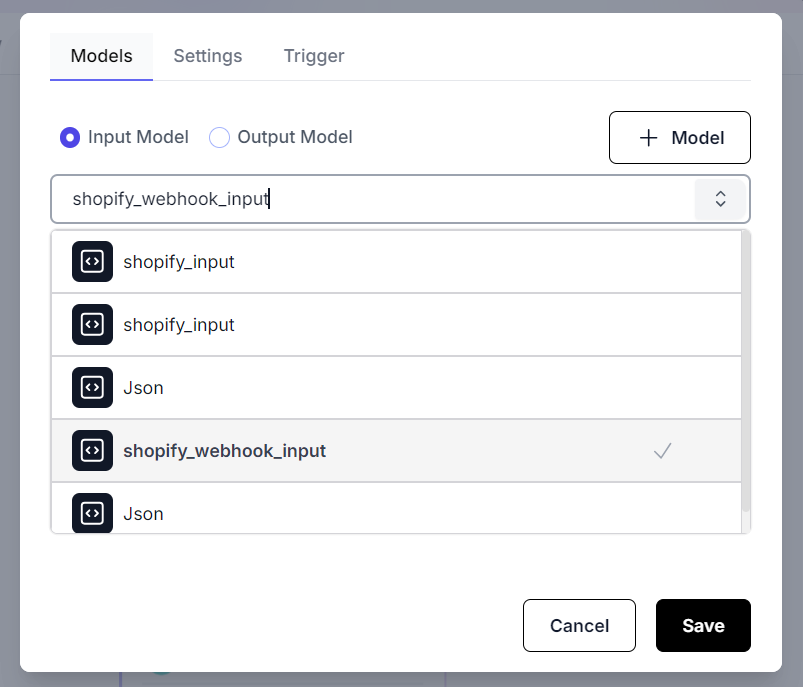
- We are going to give the model a name. In the
Generate Modeltab, paste the JSON object model of the Shopify webhook body which is the format that new product updates will be sent. Click onImportto automatically generate the input model and save it.
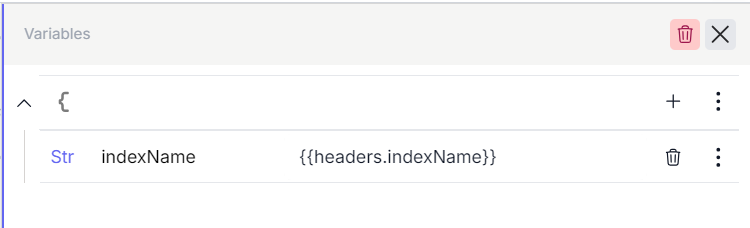
- Next, drag and drop a variable step and set it up as shown below. The
indexNamewill be passed as part of the headers when the webhook is triggered.
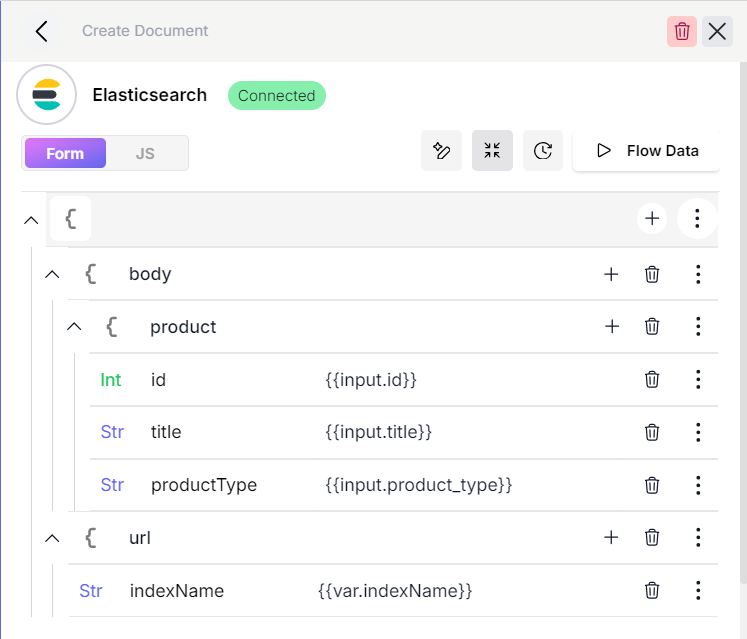
- Drag and drop an Elasticsearch connector for the
Create DocumentAPI. Set it up as shown in the image below. Each product update will create a new document in Elasticsearch.
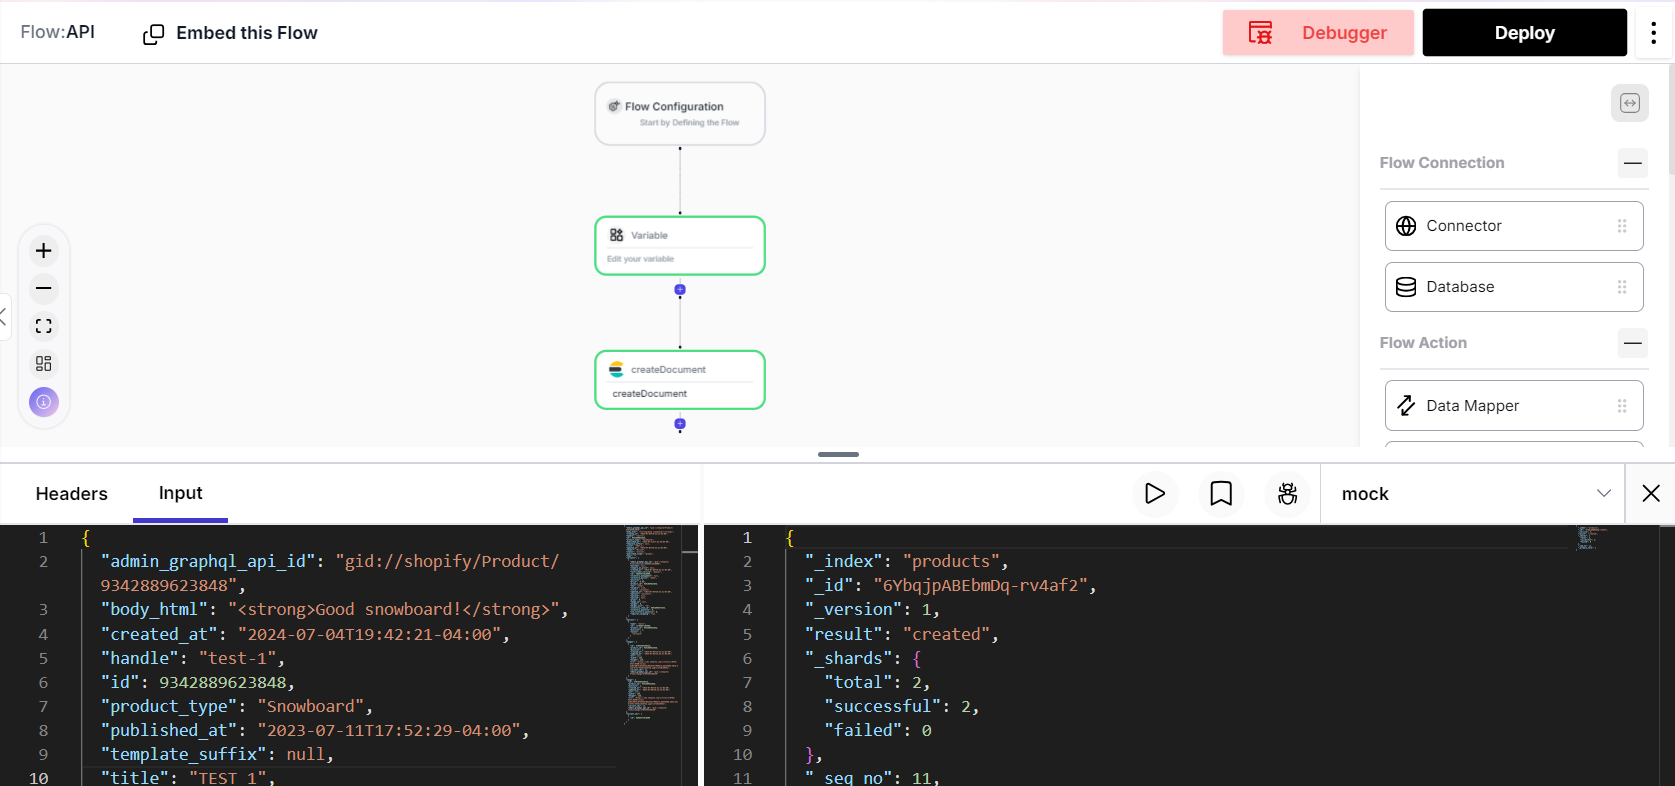
- This setup completes the update flow and we can test it using the
Debuggerby providing anindexNamein the headers and an input sample in the input box.
- The update flow will successfully add a new product that was sent

Part V - Setting up a Widget
- In Parts I to IV, we have built a number of flows which enable exporting Shopify products to Elasticsearch and keeping the database updated. In this section, we are going to take a look at how to automatically enable those flows at the click of a single button.
What is a widget?
-
A widget is customizable UI element used to interact with fastn flows that can be easily embedded into user apps.
-
We are going to use a widget to activate our Shopify export flows.
Using the templated activate flow
-
Before we create our widget we need an activate flow. An activate flow will perform multiple actions. It will prepare the Elasticsearch database by creating indexes and importing required flows, such as exporting Shopify products, updating Shopify products, and searching for Shopify products in Elasticsearch. Additionally, it will create the necessary webhooks in fastn and Shopify, allowing product updates to be sent.
-
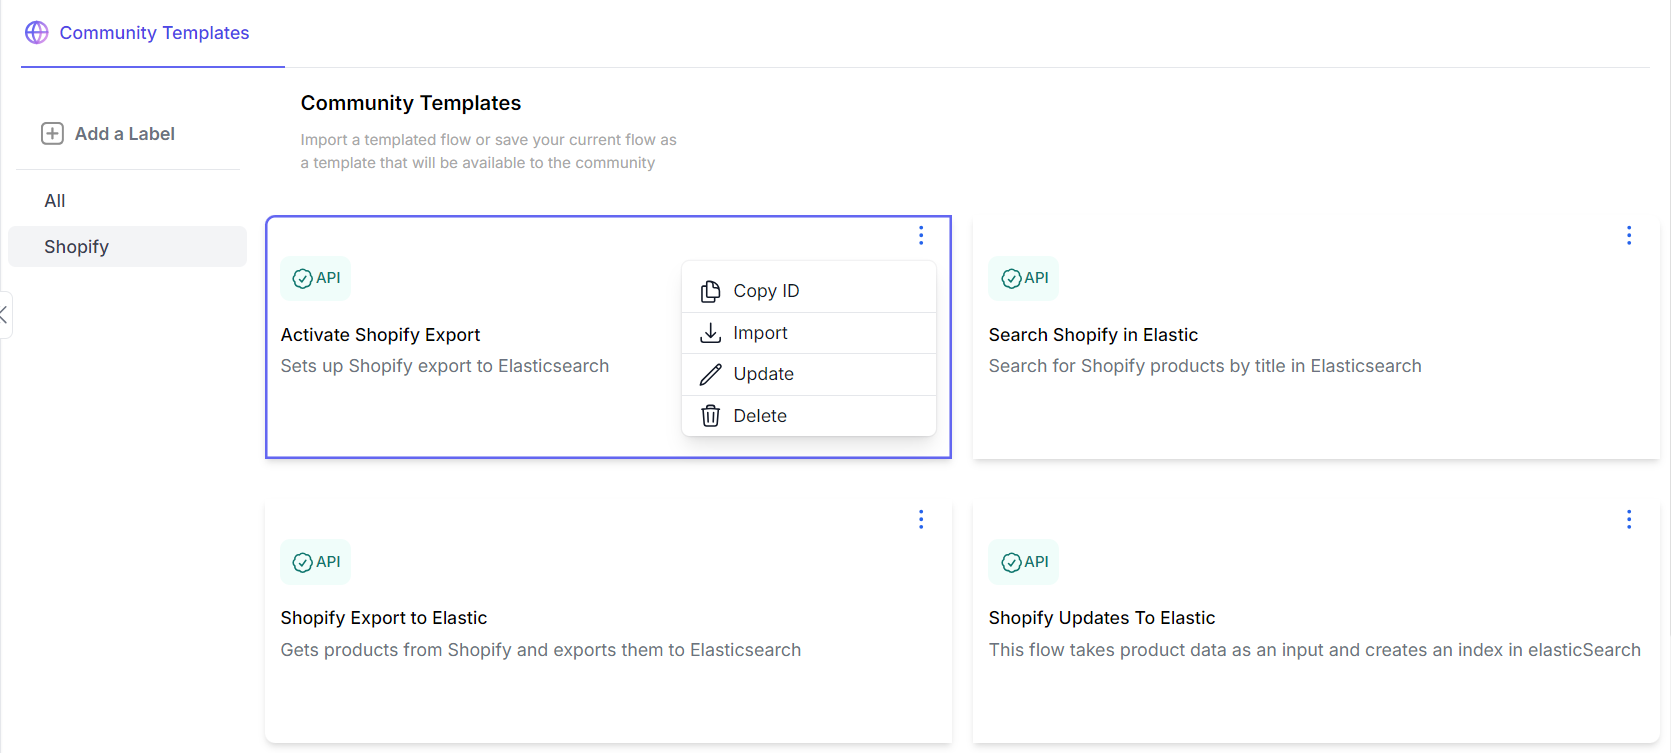
The activate flow is a complex one and it highlights the importance of templates. Templates are a means of storing and sharing created with flows within an organization or across the community. This flow is already available as a community template that users can import into their projects.
-
To import this flow, on the
Flowspage click onTemplateson the top right. Select the Community Templates tab and click on the Shopify label. Click on the three dots next to the "Activate Shopify Exports" template and import it.
- Once the flow is imported, it will show up on the
Flowspage. Next we are going to open the Flow and update the projectId in the Variables step to match the current project id which can found in the URL as shown in the images below.

![]()
- Next we are going to deploy the flow by clicking on the Deploy button on the top right.
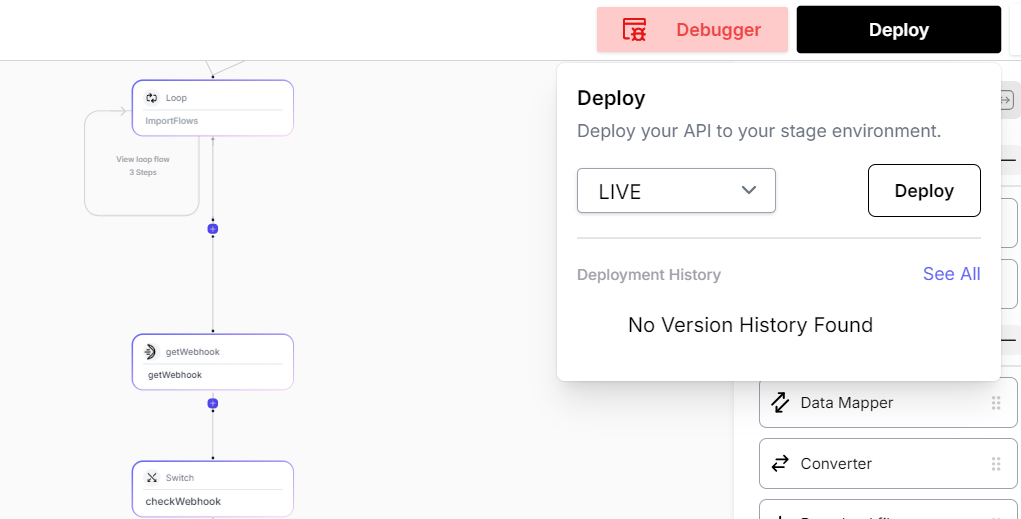
- Once the flow is deployed we are now ready to create our widget to trigger it.

Creating a widget
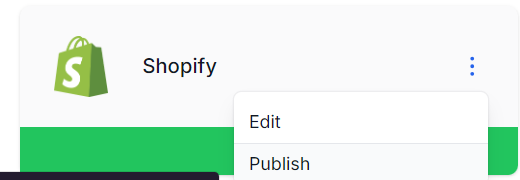
- Go to the Connectors page, and find the Shopify connector under fastn connectors. Click on the three dots to see additional options and click on
Publish.
- This will open the create a widget page with Shopify's info pre-filled. Next add the activate
Shopify Exportsflow as an activate action as shown below and update the widget.
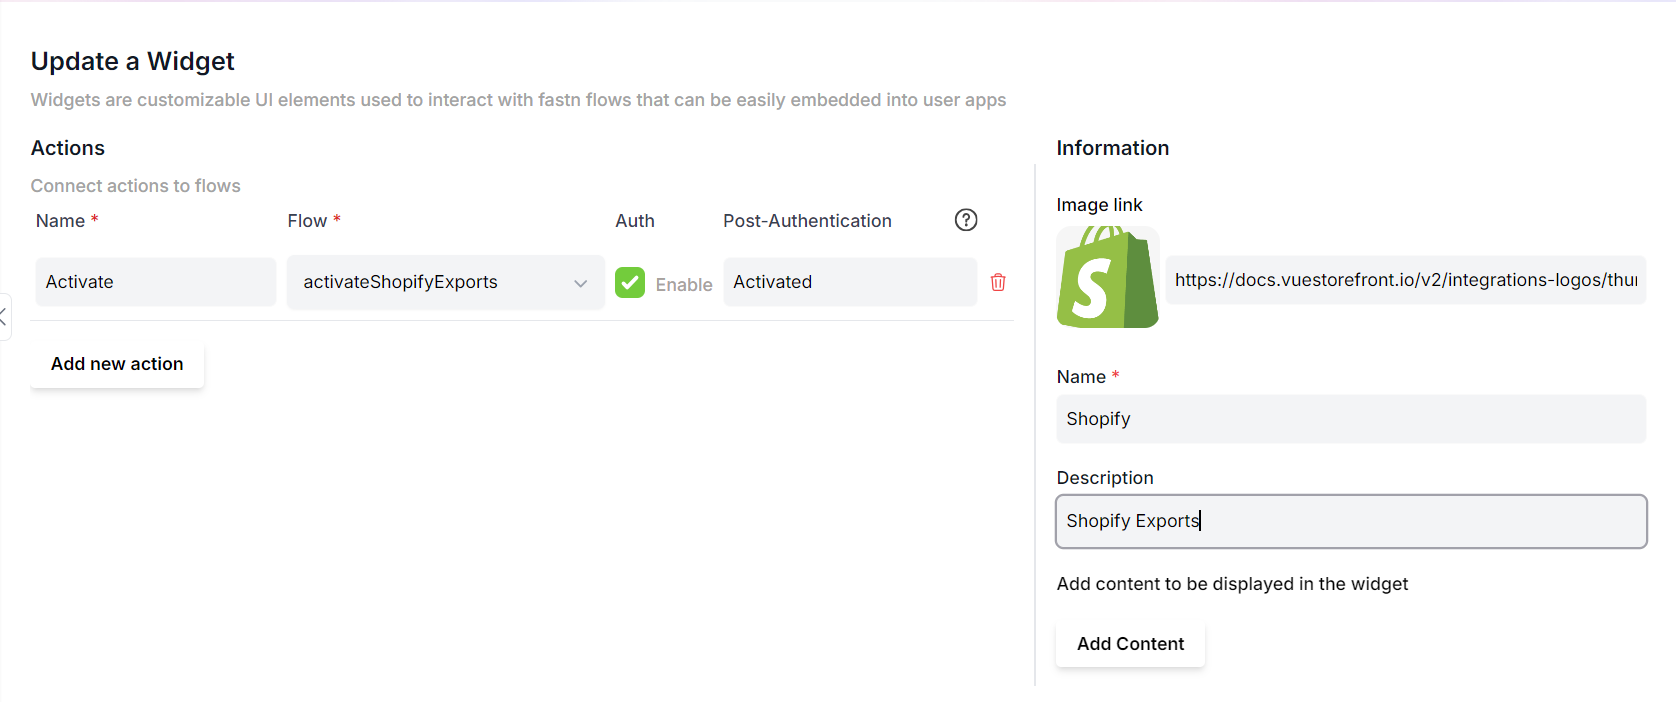
- After the update the widget will be published. The published widget can be viewed by going to the Widgets page.
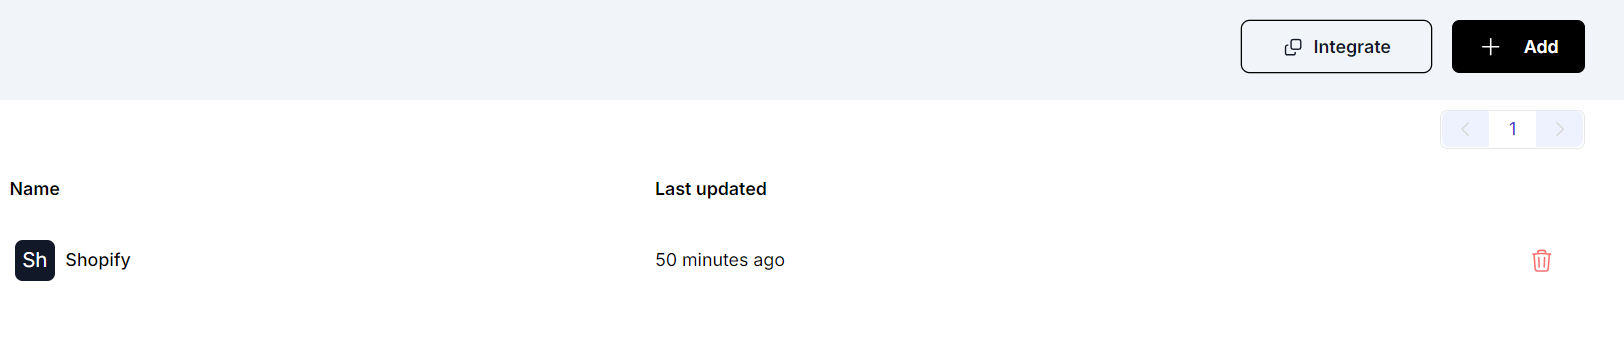
- Click on the integrate button, generate a key and click preview to open the preview page and see the created widget.
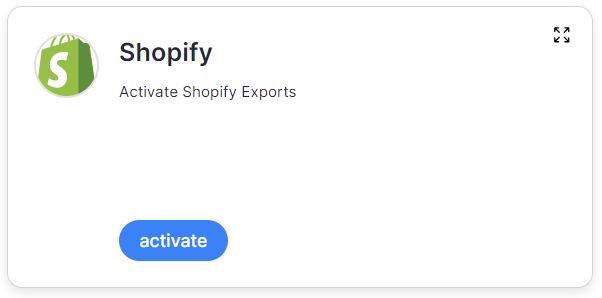
Activating the flow
-
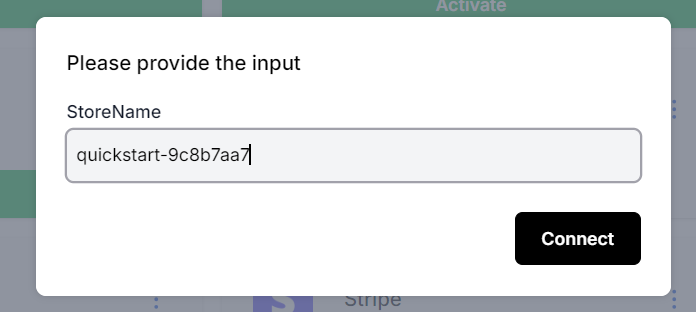
Clicking on the
Activatebutton will trigger the authentication of Shopify connector. Which will ask for the store name and authenticate using oauth. -
Once the authentication is successful the activate flow will be triggered.
-
This step will import the required flows, which can be seen deployed of the
Flowspage

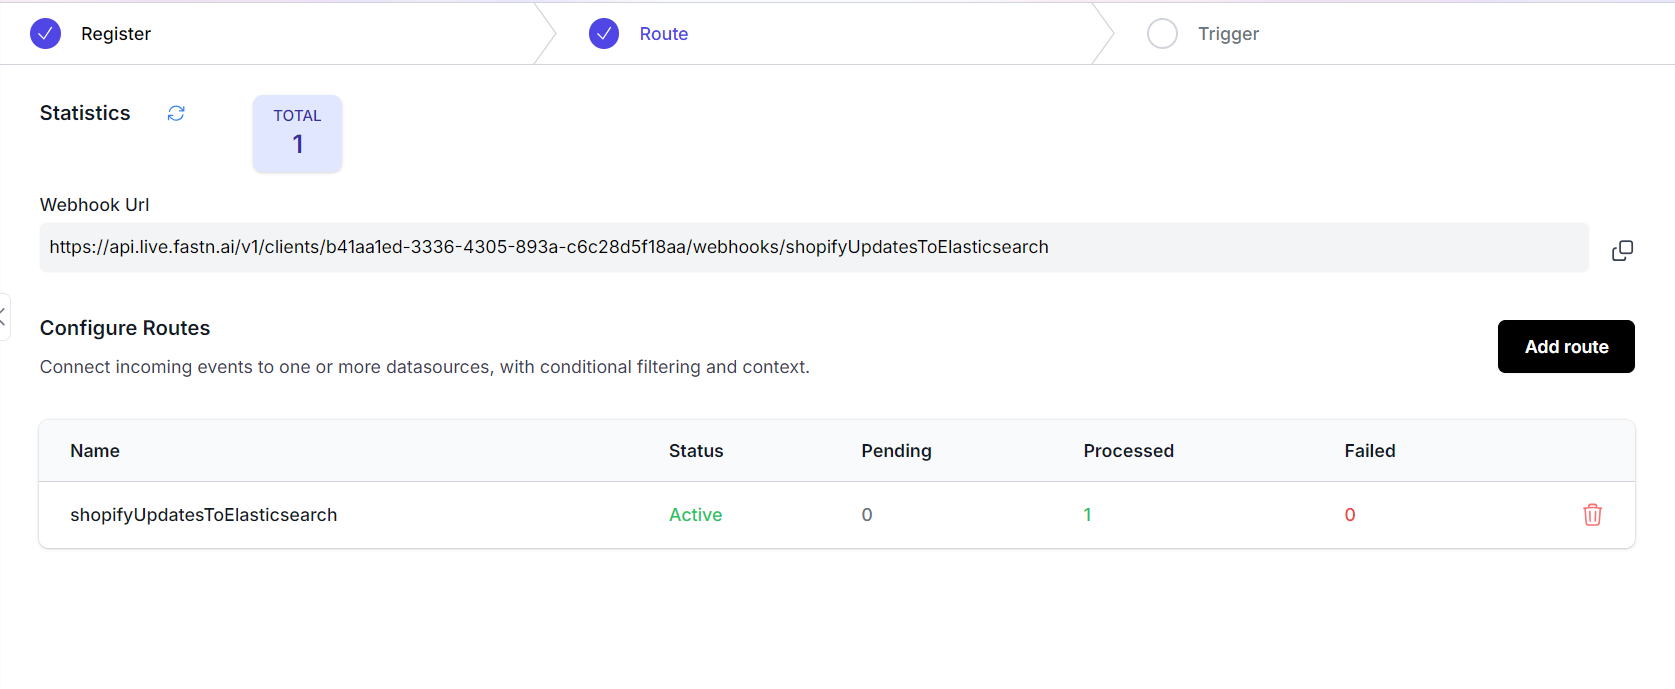
- Create a webhook with the desired configurations, which can be seen on the
Webhookspage.
Testing the complete flow
-
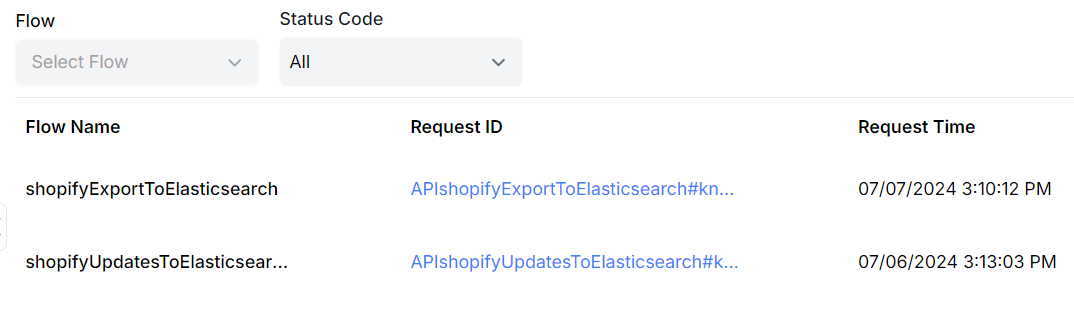
Once the widget is triggered and the webhook created. The Shopify export flow will be triggered once to do a bulk export. In the
Insightspage this flow can be seen triggered and items will appear in the Elasticsearch database. -
If we add a new product on the Shopify store. The updates flow will be triggered and the new item can be seen in the Elasticsearch database.
-
Both of these flows can be seen in the
Insightspage along with details of their execution like time of execution, log messages etc.
Congrats on following this guide to the end!