# How to Customize your Authentication Flow?

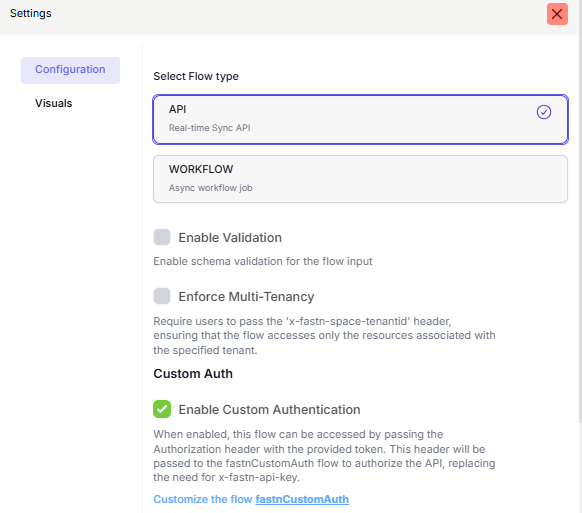
## 1. Enable Custom Auth in Settings

* Go to the **right-hand sidebar → Settings → Configuration**.
* Under **Custom Auth**, toggle **Enable Custom Authentication**.
* Save your changes.

<figure><img src="https://1255842839-files.gitbook.io/~/files/v0/b/gitbook-x-prod.appspot.com/o/spaces%2F3iSr2Tx8FvvuoLPncziH%2Fuploads%2FRJ1GFUMZup1q4GQ0KuE2%2Fimage.png?alt=media&#x26;token=964ae747-1575-4414-8879-35378cdd0a7a" alt=""><figcaption></figcaption></figure>

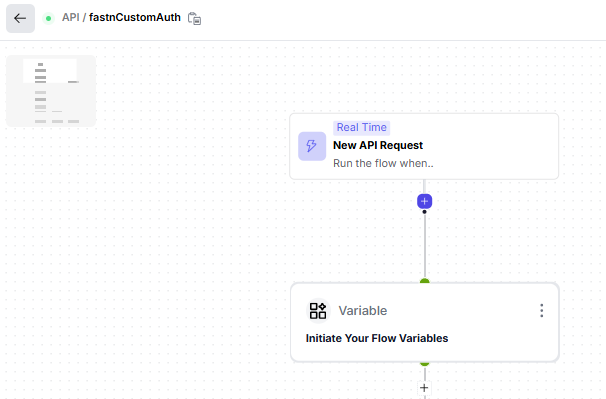
## 2. Open the Custom Auth Flow

* Navigate to the **fastnCustomAuth** flow.
* This flow always begins with an **On API Request** trigger.

<figure><img src="https://1255842839-files.gitbook.io/~/files/v0/b/gitbook-x-prod.appspot.com/o/spaces%2F3iSr2Tx8FvvuoLPncziH%2Fuploads%2FvI6O1qlXZ99ag24Bq8wp%2Fimage.png?alt=media&#x26;token=1bcebef3-d9c7-4569-95ce-f7a8a994ff09" alt=""><figcaption></figcaption></figure>

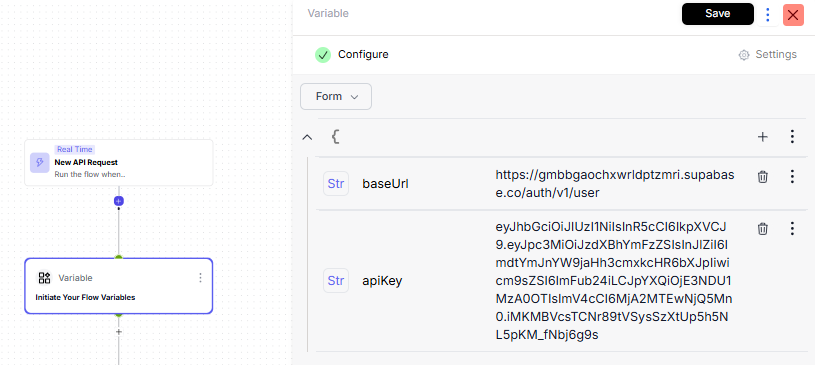
## 3. Initialize Flow Variables

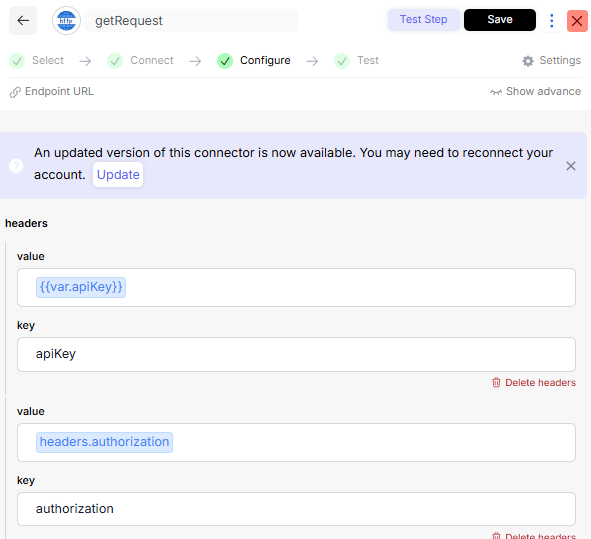
* Add variables such as `baseURL` and `APIKey`.
* These can be predefined defaults for your flow, but you can alter them if needed.

<figure><img src="https://1255842839-files.gitbook.io/~/files/v0/b/gitbook-x-prod.appspot.com/o/spaces%2F3iSr2Tx8FvvuoLPncziH%2Fuploads%2FUEAVFcZCITLHJIvcsIag%2Fimage.png?alt=media&#x26;token=bc5e3533-da93-492d-8d73-2905d6de11ec" alt=""><figcaption></figcaption></figure>

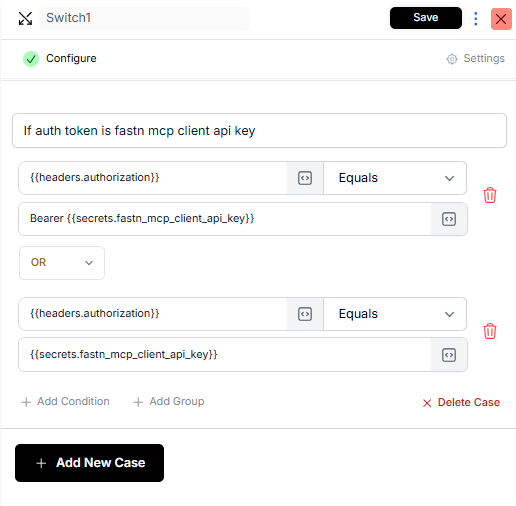
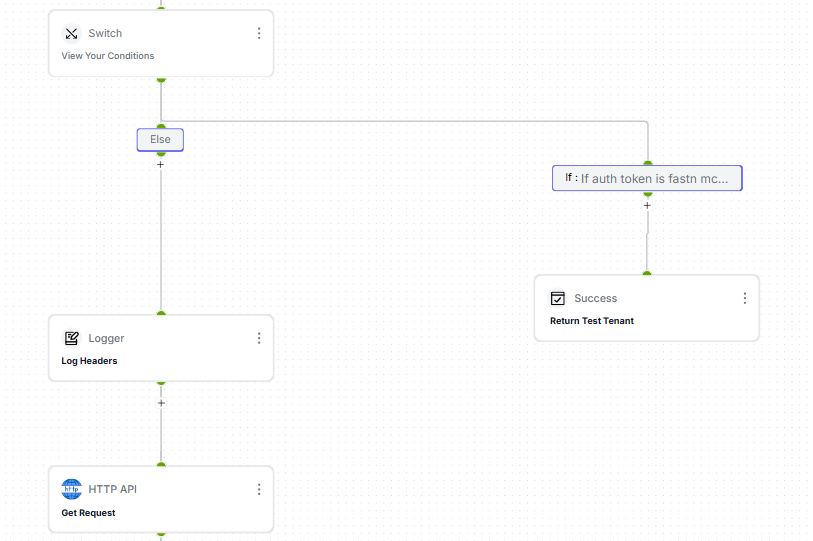
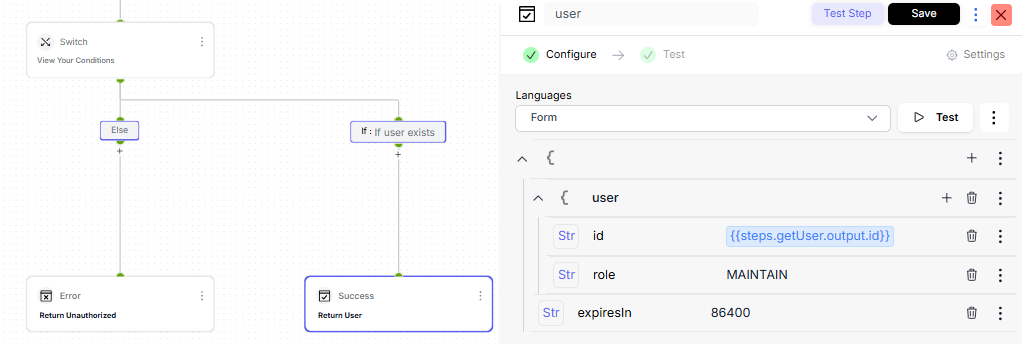
## 4. Apply Token Validation (Switch Step)

* At this stage, the flow checks the Authorization header against the predefined Fastn secret (`fastn_mcp_client_api_key`).

<figure><img src="https://1255842839-files.gitbook.io/~/files/v0/b/gitbook-x-prod.appspot.com/o/spaces%2F3iSr2Tx8FvvuoLPncziH%2Fuploads%2F3JLbRv0DqYNzS9c6k5XT%2Fimage.png?alt=media&#x26;token=b49618fd-0866-4543-b19a-67955c6874fd" alt=""><figcaption></figcaption></figure>

* **Condition 1:** If `headers.authorization` **equals**

  ```
  Bearer {{secrets.fastn_mcp_client_api_key}}
  ```

  → **Pass**.
* **Condition 2:** If `headers.authorization` **equals**

  ```
  {{secrets.fastn_mcp_client_api_key}}
  ```

  → **Pass**.

**When one of the conditions matches:**

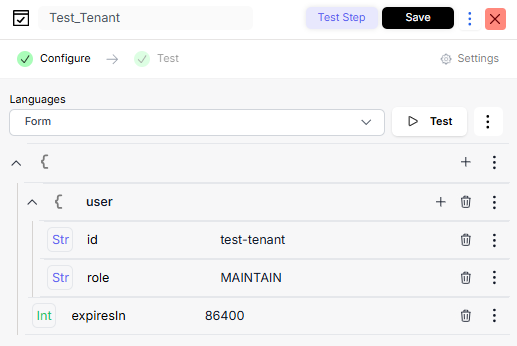
* The flow returns a **user object** that contains:
  * `tenantId`
  * `role`
  * `expiresIn`
* All inside a success response.

<figure><img src="https://1255842839-files.gitbook.io/~/files/v0/b/gitbook-x-prod.appspot.com/o/spaces%2F3iSr2Tx8FvvuoLPncziH%2Fuploads%2FCIfqtRBCzhL37txqTTjG%2Fimage.png?alt=media&#x26;token=a6ebdb29-7978-4714-a2b2-fcf4a4e79d63" alt=""><figcaption></figcaption></figure>

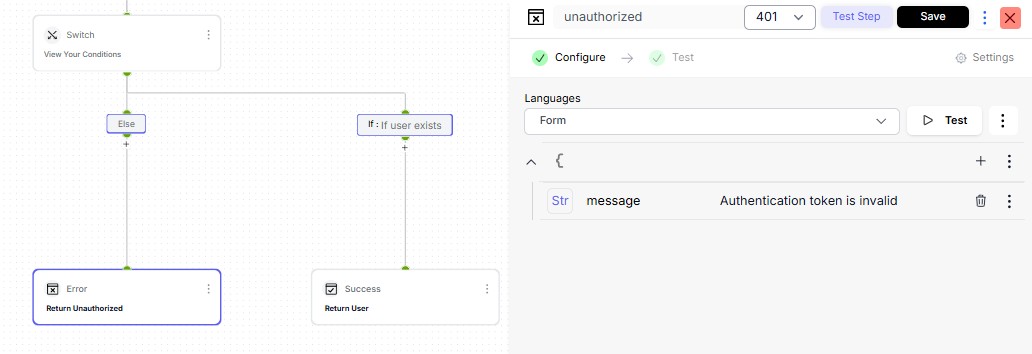
**When no conditions match:**

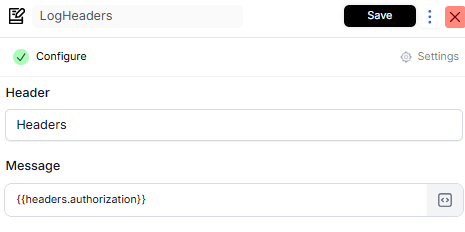
* The flow continues to the **Logger** step for tracking request headers.

<figure><img src="https://1255842839-files.gitbook.io/~/files/v0/b/gitbook-x-prod.appspot.com/o/spaces%2F3iSr2Tx8FvvuoLPncziH%2Fuploads%2Fj2OVfHCoXOwdT5wGo5iu%2Fimage.png?alt=media&#x26;token=aa046692-2764-489b-8e52-74940f5cf61f" alt=""><figcaption></figcaption></figure>

## 5. Handle Logs and External Checks

* **Logger Step** → capture the request headers.

<figure><img src="https://1255842839-files.gitbook.io/~/files/v0/b/gitbook-x-prod.appspot.com/o/spaces%2F3iSr2Tx8FvvuoLPncziH%2Fuploads%2FilIBxcwCaEySHSythW1g%2Fimage.png?alt=media&#x26;token=53f44e95-bc60-4d45-82cc-43fc2118bd6e" alt=""><figcaption></figcaption></figure>

* **GET Request (HTTP API)** → check if the user exists externally.

<figure><img src="https://1255842839-files.gitbook.io/~/files/v0/b/gitbook-x-prod.appspot.com/o/spaces%2F3iSr2Tx8FvvuoLPncziH%2Fuploads%2FUvrn15Xc9eDMHt24DTGR%2Fimage.png?alt=media&#x26;token=ad233d09-0191-4c7f-9e09-0e985767f481" alt=""><figcaption></figcaption></figure>

* **Final Switch Step**

<figure><img src="https://1255842839-files.gitbook.io/~/files/v0/b/gitbook-x-prod.appspot.com/o/spaces%2F3iSr2Tx8FvvuoLPncziH%2Fuploads%2FoNWmYUhCmRgN22xTQUo3%2Fimage.png?alt=media&#x26;token=9feb9132-595d-4ec2-8739-e80f21c51fe3" alt=""><figcaption></figcaption></figure>

* If user exists → return user details.

<figure><img src="https://1255842839-files.gitbook.io/~/files/v0/b/gitbook-x-prod.appspot.com/o/spaces%2F3iSr2Tx8FvvuoLPncziH%2Fuploads%2FhdsiapKcl8Uai5QSkv6H%2Fimage.png?alt=media&#x26;token=035f05dd-85ec-47d4-9bad-d902fda896a2" alt=""><figcaption></figcaption></figure>

* If not → return error and unauthorized.

<figure><img src="https://1255842839-files.gitbook.io/~/files/v0/b/gitbook-x-prod.appspot.com/o/spaces%2F3iSr2Tx8FvvuoLPncziH%2Fuploads%2FjPXFm120BEGRr0PWXVU0%2Fimage.png?alt=media&#x26;token=1db6ec43-dc15-4d6e-8823-0cfaafbaee27" alt=""><figcaption></figcaption></figure>

## 6. Save and Customize

* Save the flow once configured.
* You can customize the logic to match your own authentication provider, add extra validation rules, or enrich the returned user object.

> With this setup, you decide exactly how requests are authenticated and what user details are returned.


---

# Agent Instructions: Querying This Documentation

If you need additional information that is not directly available in this page, you can query the documentation dynamically by asking a question.

Perform an HTTP GET request on the current page URL with the `ask` query parameter:

```
GET https://docs.fastn.ai/flows/tutorials/flow-customization-and-operations/how-to-customize-your-authentication-flow.md?ask=<question>
```

The question should be specific, self-contained, and written in natural language.
The response will contain a direct answer to the question and relevant excerpts and sources from the documentation.

Use this mechanism when the answer is not explicitly present in the current page, you need clarification or additional context, or you want to retrieve related documentation sections.
